
Most people decide they want to stain their floor and then start looking at colour swatches. That's not the wrong place to start — but it's only part of the picture. The colour you choose is the final decision in a process that begins with the timber species, the age of the floor, the sanding preparation beneath the stain, and the lacquer that goes on top of it. Get those right and the result can be extraordinary. Skip any of them and the colour you chose from the swatch will look nothing like what ends up on the floor.
Here's what staining and lacquering a wooden floor actually involves — and what to know before you commit to a colour.
What Staining Actually Does to a Wood Floor
Before anything else, it's worth being clear about what staining is and isn't.
Staining changes the colour of the timber. It doesn't protect it. The lacquer that goes on top does the protecting — the stain is purely about appearance. This is why the order of operations matters: sand the floor, apply the stain, let it dry, seal it with lacquer. Change that sequence and you either get a finish that won't bond properly or a colour that isn't fixed beneath anything durable.
Staining works by penetrating the grain of the timber and depositing colour into the wood's cellular structure. This means the result depends heavily on the species — how open the grain is, how absorbent the timber is, how the cells take the pigment. The same stain applied to pine and to oak will produce two different results, because the materials respond differently. This isn't a problem if you understand it going in. It's a nasty surprise if you don't.
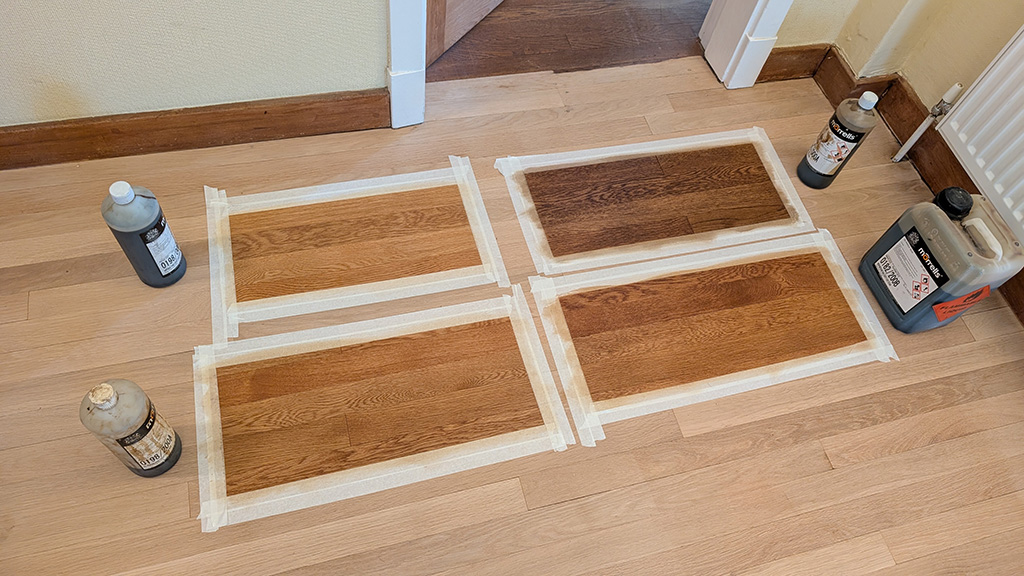
At Floorworks, we use Morrells Light Fast stains (and other similar alchohol based) as our primary staining product for lacquered floors. They come in a wide range of colours, apply evenly across different species when prepared correctly, and work well as a base layer beneath professional-grade clear lacquers. The result — when the preparation is right — is a colour that looks intentional and consistent rather than patchy or flat.
The Preparation That Makes or Breaks the Result
Staining a floor that hasn't been properly sanded is one of the most common mistakes — and one of the most expensive to undo.
The sanding stage removes the existing finish and brings the floor back to bare, raw timber. This is essential for staining because the stain needs to penetrate the wood itself, not sit on top of an old lacquer or oil layer. Any residual finish on the surface will block the stain from absorbing evenly — creating patches where the colour is lighter, areas where it hasn't taken at all, and a result that looks streaky and inconsistent.
This is also why the grit sequence in sanding matters before a stain goes down. A floor finished too coarsely has visible scratch marks that the stain will pick up and emphasise — the colour deposits more heavily in the scratches, creating a texture effect that draws the eye immediately. We finish sanding to a fine grit before any stain is applied specifically to avoid this.
Once the floor is sanded back to clean, consistent bare timber, it's ready to take a stain evenly — and that even absorption is what produces a uniform, professional result rather than a blotchy one.
How Different Timber Species Take Stain
Not all timber responds to stain in the same way. Understanding the species you're working with is what allows the right colour to be chosen and the right application approach to be used.
Oak
Oak is the most popular timber for staining in London — partly because it's the most common floor species we work with, and partly because it takes stain exceptionally well. The open grain of oak absorbs water-based stains evenly and consistently, which means the colour translates predictably from the sample to the floor.
The most popular stain choices on oak right now are:
Grey tones — from light ash grey to deeper charcoal — have been a dominant trend for several years and show no sign of fading. They work particularly well in contemporary open-plan interiors where the floor needs to anchor a neutral palette without competing with it.
Dark tones — ebony, dark walnut, deep mahogany — give oak a richness and formality that works beautifully in period properties. A dark-stained herringbone or chevron floor in a Victorian hallway is one of the most striking results we produce.
White and whitewash — a white primer or whitewash stain lightens the natural tone of oak, lifting the space and creating a Scandinavian-influenced aesthetic that works in both period and contemporary settings. This requires specific products — we use Bona White primer for this effect — and a lighter touch with application to avoid opacity.
Natural and clear — many oak floors don't need any stain at all. A clear lacquer over a properly sanded oak floor reveals the natural character of the grain and produces a warm, honest result that's hard to improve on. It's always worth considering whether colour is needed before adding it.
Pine Floorboards
Pine is a softwood, which means it's significantly more absorbent than oak. That absorbency is what makes it one of the best species for staining — the stain soaks into the grain deeply and produces a rich, saturated colour that holds well under lacquer.
What most people don't realise is how convincingly pine takes darker stains. A pine floor stained in a deep walnut or mahogany tone looks genuinely similar to those hardwood species — the grain pattern of pine is close enough that the resemblance is real, not approximate. It's one of the most cost-effective ways to achieve the look of a premium hardwood species on an existing floor.
Popular choices on pine include mid-brown and dark walnut tones, grey washes, and black stains for a dramatic, contemporary result. Light stains work less well on pine because the natural colour of the wood is already light and the contrast is minimal.
Parquet Flooring
Parquet flooring — oak, teak, merbau, or pine blocks — is perfectly suited to staining as part of a restoration project. Once the existing finish is sanded away and the blocks are back to bare timber, the surface takes stain in the same way as any other floor of the same species.
The visual effect of a stained parquet floor is particularly striking because the geometric pattern of the blocks creates a faceted quality — light catches different blocks at slightly different angles, and a stained surface emphasises this rather than flattening it. A dark-stained herringbone floor has a depth and dimensionality that a natural finish sometimes doesn't.
One thing worth noting specifically for parquet: teak and merbau are oily timbers, and that natural oil content can affect how well water-based stains absorb. These species sometimes require a different approach to preparation — we'll advise on this at the site visit if your floor is one of these species.
Engineered Wood Flooring
Engineered floors can be stained, but the process requires more care. The hardwood surface layer is thin — typically 3mm to 6mm depending on the product — which means the sanding that exposes bare timber for staining has to be done with precision to avoid removing too much material.
Once sanded to bare wood, engineered floors take stain in the same way as solid timber of the same species. The result looks identical. The constraint is simply that the number of times it can be repeated is limited by the remaining surface layer — so if your engineered floor has been sanded before, check the remaining thickness before committing to a stain and re-lacquer process.
Maple
Maple is the one species that warrants a specific caution. It's highly absorbent — more so than oak — and that absorbency means stain goes on fast and can blotch or absorb unevenly if the application isn't controlled carefully. Staining maple to a consistent, professional result is possible but requires specific product selection and a more careful application technique. We'll always flag this at the survey if your floor is maple and a colour change is planned.
The Lacquer: What Goes on Top and Why It Matters
The stain is the colour. The lacquer is what keeps it there.
For stained floors, we always use water-based lacquers rather than oil-based products. The reason is straightforward: oil-based lacquers amber over time, which means they yellow as they age. On a natural floor, that yellowing adds warmth and is often considered attractive. On a stained floor — particularly one stained grey or white — that yellowing shifts the colour over time in a direction nobody planned. A grey floor sealed with an oil-based lacquer will develop a green or khaki cast within a few years. That's not what anyone wanted.
Water-based lacquers dry clear and stay clear. The colour beneath them remains true to what was applied.
Bona Traffic HD is our default lacquer for stained floors in high-traffic areas — hallways, open-plan living spaces, kitchens. It's a two-component water-based polyurethane that produces an exceptionally hard, durable film and can take light foot traffic within 12 hours of the final coat. For a stained floor that needs to look its best for a decade, this is the product we trust.
Bona Mega is a single-component water-based lacquer well suited to lower-traffic areas — bedrooms, studies, less-used rooms — where the additional hardness of a 2K system isn't necessary but the clarity and non-yellowing properties of a water-based product still matter.
Junckers HT700 is our choice for commercial spaces and high-traffic public floors where durability under sustained foot traffic is the priority. It's a 2K system specifically developed for sports halls and commercial environments, but its hardness and resistance make it appropriate for any floor that takes serious daily use.
On a stained floor, we typically apply one primer coat followed by two to three coats of clear lacquer — building up a protective film that locks the colour in and protects the surface from wear, moisture, and the daily reality of a busy home or commercial space.
Sheen Level: The Decision Most People Leave Too Late
One thing that often gets decided at the last minute is the sheen level — and it makes a significant difference to the final result.
Lacquers come in extra-matt, matt, satin, and gloss. For stained floors, sheen level affects how the colour reads. A dark-stained floor in gloss lacquer is reflective and formal — beautiful in the right setting, but overwhelming in a casual domestic interior. The same colour in extra-matt reads as quieter, more textural, more contemporary.
As a general rule, darker stains work better in lower sheens — extra-matt or matt — because the reflective quality of a gloss finish on a very dark floor can look heavy. Grey stains tend to suit matt or satin. Lighter stains and natural finishes can carry a satin sheen without looking excessive.
We'll go through sheen options at the survey and show you samples where possible — because this is genuinely a decision that's easier to make on the actual floor than from a description.
Contact Floorworks™ for a free professional consultation

Staining a wooden floor before lacquering is one of the most effective ways to completely transform the character of a space — but the result depends on everything that happens before the colour goes on. The species has to be right for the colour chosen, the preparation has to bring the floor to clean, consistent bare timber, the stain has to be applied evenly to an appropriately sanded surface, and the lacquer that seals it has to be water-based, correctly specified, and applied in enough coats to protect the colour for years rather than months.
At Floorworks, wood floor staining is something we do as part of every restoration project where a colour change is planned — and the most popular combinations we produce are grey-stained oak in extra-matt Traffic HD, dark walnut-stained pine in satin Bona Mega, and whitewashed herringbone parquet in matt lacquer. Each of them starts with the same foundation: preparation done properly, colour chosen for the species, lacquer specified for the use.
If you're considering a stained and lacquered floor — whether it's a restoration of an existing floor or a colour change as part of a wider renovation — get in touch with Floorworks for a free site visit. We'll look at the timber, talk through the colour options, and give you a clear picture of what's possible before any commitment is made.


